* Microsoft Visual Basic 6
* Microsoft SQL Server 2008 R2
* Crystal Report 9
Problem :
* Want to display report in code Visual Basic 6 and display in another Window
* Using CRAXDRT.Report and Crystal Report Viewer
Solution :
1. Example of Tables,
2. Go to menu "Project > References ... ".
Add for these References :
A. Microsoft ActiveX Data Objects 2.8 Library
B. Crystal Report Viewer Control 9
C. Crystal Reports 9 ActiveX Designer Run Time Library
D. Crystal Report Viewer Control
E. Crystal Report Viewer Control 9
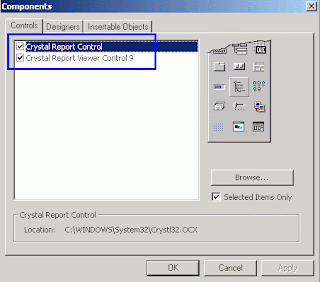
3. Go to menu "Project > Components ... ".
Add for these Components :
A. Crystal Report Control
B. Crystal Report Viewer Control 9
4. Design an form, example name "Form1.frm"
5. Design an form, example name "ReportViewFrm.frm"
6. In form name ""Form1.frm", fill the below code
'-------------------------------------------------------------------------------------
'-------------------------------------------------------------------------------------
'----CODE START
Private Sub command1_Click()
ReportViewFrm.Show
End Sub
Private Sub Form_Load()
End Sub
'----CODE END
'-------------------------------------------------------------------------------------
'-------------------------------------------------------------------------------------
7. In form name "ReportViewFrm.frm", fill the below code
'-------------------------------------------------------------------------------------
'-------------------------------------------------------------------------------------
'----CODE START
Private Sub Form_Load()
Dim CrxApp As CRAXDRT.Application
Dim CrxRep As CRAXDRT.Report
Dim crxDatabase As CRAXDRT.Database
Dim crxDatabaseTables As CRAXDRT.DatabaseTables
Dim crxDatabaseTable As CRAXDRT.DatabaseTable
Set CrxApp = New CRAXDRT.Application
Set CrxRep = CrxApp.OpenReport(GetAppPath() & "Report1.rpt", 1)
'Set your Database object to the Report object's Database object
Set crxDatabase = CrxRep.Database
'Set your DatabaseTables object to the Database object's Tables object
Set crxDatabaseTables = crxDatabase.Tables
'Loop through each DatabaseTable object in the DatabaseTables collection and then set the location
'of the database file for each table
For Each crxDatabaseTable In crxDatabaseTables
'If you are using physical path of the access database file (Native connection to PC database)
'-----crxDatabaseTable.Location = App.Path & "\xtremelite.mdb"
'Use next line, if you are using Native connection to SQL database
crxDatabaseTable.SetLogOnInfo "(local)\sql2008", "Northwind", "sa", "sasasa"
'Use next line, if you are using ODBC connection to a PC or SQL database
'crxDatabaseTable.SetLogOnInfo "ODBC_DSN", "databasename", "userid", "password"
Next crxDatabaseTable
CRViewer91.ReportSource = CrxRep
CRViewer91.EnableExportButton = True
CRViewer91.EnableCloseButton = True
CRViewer91.EnableProgressControl = True
CRViewer91.EnableZoomControl = True
CRViewer91.ViewReport
CRViewer91.Refresh
Set crxDatabase = Nothing
Set crxDatabaseTable = Nothing
Set crxDatabaseTables = Nothing
Set CrxRep = Nothing
Set CrxApp = Nothing
End Sub
Private Sub Form_Resize()
CRViewer91.Top = 0
CRViewer91.Left = 0
CRViewer91.Height = ScaleHeight
CRViewer91.Width = ScaleWidth
End Sub
Public Function GetAppPath() As String
GetAppPath = IIf(Right$(App.Path, 1) = "\", App.Path, App.Path & "\")
End Function
'----CODE END
'-------------------------------------------------------------------------------------
'-------------------------------------------------------------------------------------
A.
B.
C.
D.
E.
8.
Next, Prepare file name "Report1.rpt",
A. then create a new Blank Report
B. Choose "Create Connection > OLE DB (ADO) > Microsoft OLE DB Provider for SQL Server"
C. Setting the connection to SQL Server
A.
B.
C.
D.
E.
9. Choose "Database : Northwind, Tables : Categories"
10.
Drag the column "CategorieyID, CategoryName, Description" to Design "Details" Page.
Then click "Save".
11. Try to running the "Project1.vbp".
12. The report is already succesfully display.
Sumber:
http://www.mahipalreddy.com/cr/article52645.htm
For download an example code, please click this link :
Example Code - Crystal Report Viewer.rar
For download an example code, please click this link :
Example Code - Crystal Report Viewer.rar


